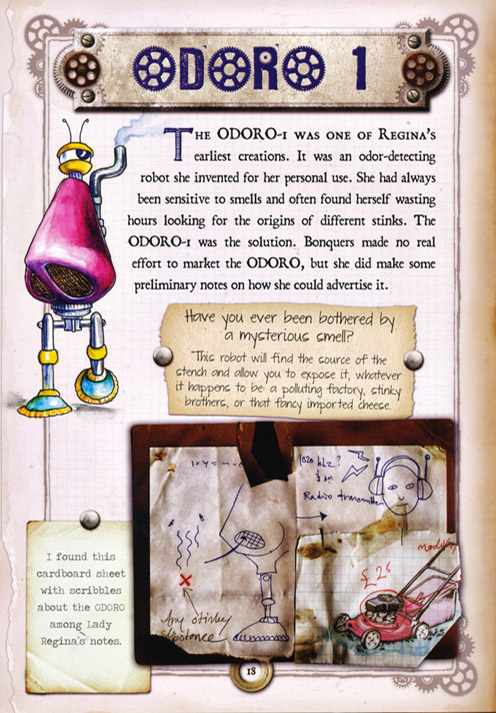
Monthly Archives: January 2013

DIY Pop-Up: Valentine Card

PDF Templates

DIY Valentine Card

For this DIY Pop-Up you will need:

  • Cardstock or heavy construction paper
  • Scissors
  • Ruler
  • Paper clip, or ballpoint pen that has run out of ink, or a knitting needle
  • Crayons, colored pencils, markers

Instructions

1 Download the PDF templates and print out at 100% size (no scaling) on a heavy paper, such as cardstock.
2 Color all of your pieces with crayons or markers before scoring and cutting.

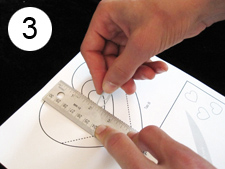
3 Use a ruler or a straight edge and a paper clip to score all the black dotted lines.
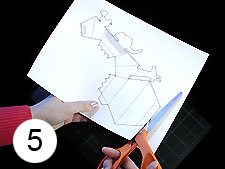
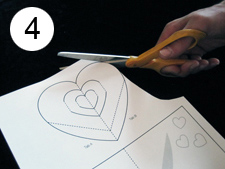
4 Next use scissors to cut out all the pieces along the black solid lines. (Do not cut the ‘inner’ hearts just yet).
5 Now take the heart piece and fold it away from you along the center dotted line. Do not unfold.

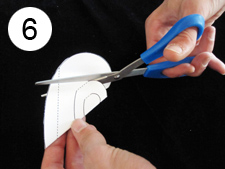
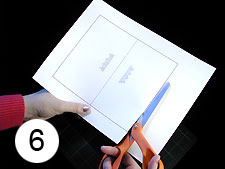
6 Next take your scissors and cut along the solid black lines.
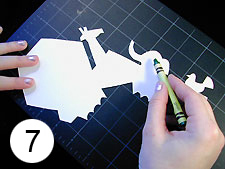
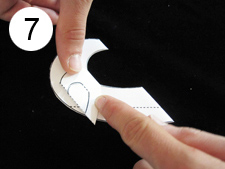
7 Now fold the second heart towards you and away from you.
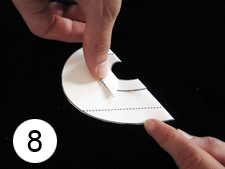
8 Next fold the third heart towards you and away from you.

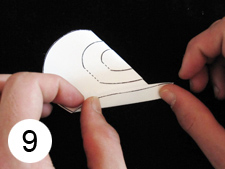
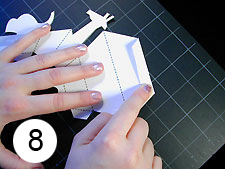
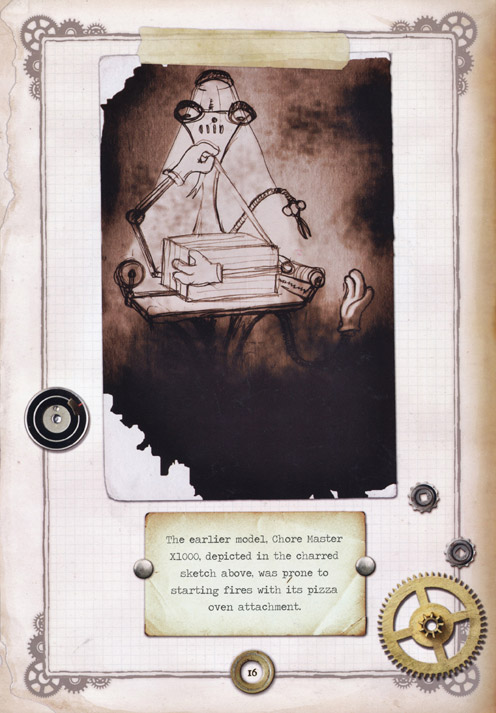
9 Next fold the bottom part of the heart piece along the dotted line (Tabs A and B) towards you and away from you.
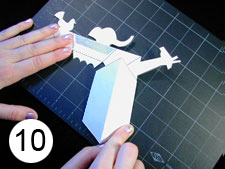
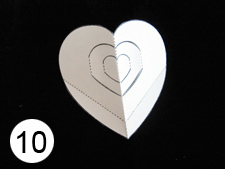
10 Unfold the heart piece.
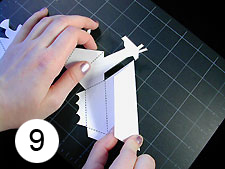
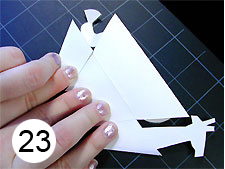
11 Now push the second heart away from you as you start to fold the entire heart piece. Fold the entire heart piece completely. Unfold.

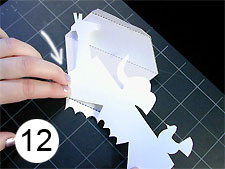
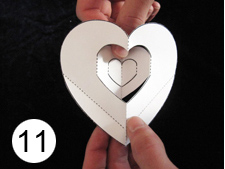
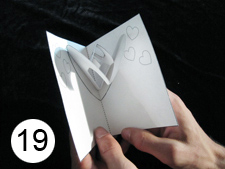
12 Next fold the third heart towards you as you start to fold the entire heart piece. Fold the entire heart piece completely. Unfold.
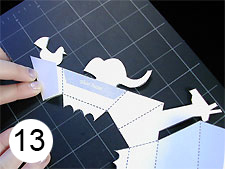
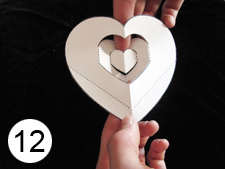
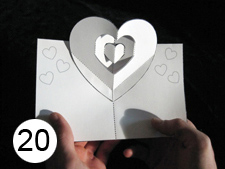
13 Now fold Tabs A and B towards you as you start to fold the entire heart away from you. Fold completely and unfold.
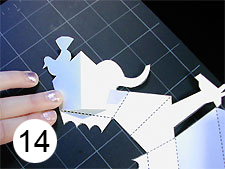
14 Take the card piece and fold it towards you along the dotted line. Fold completely and unfold.

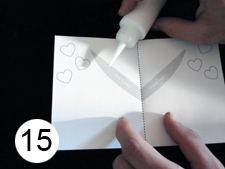
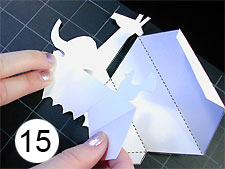
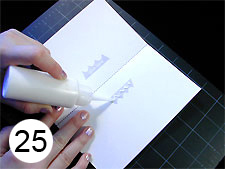
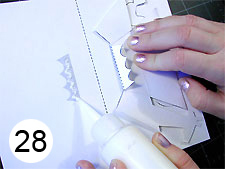
15 Next put a small amount of glue on the ‘Glue A Here’ grey shape.
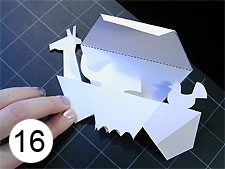
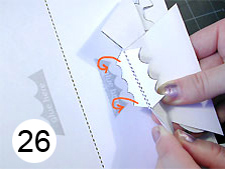
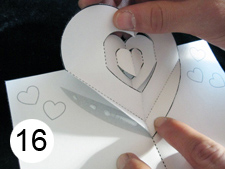
16 Next take the heart piece and line Tab A with ‘Glue A Here’ grey shape. Make sure both center dotted lines line up. Press firmly and let dry.
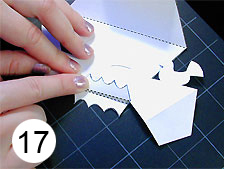
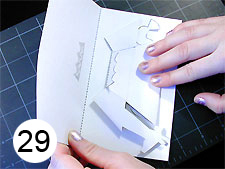
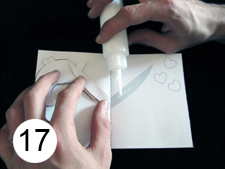
17 Next put a small amount of glue on the ‘Glue B Here’ grey shape.

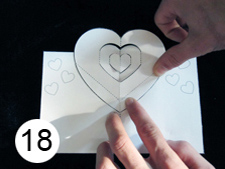
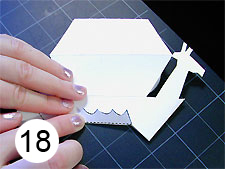
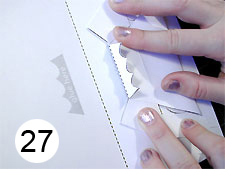
18 Now line up Tab B with the ‘Glue B Here’ grey shape. Press firmly and let dry.
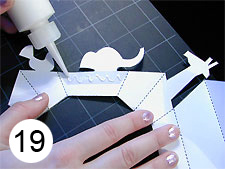
19 Next close the card completely and re-open it.
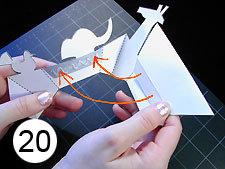
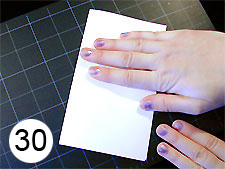
20 You’ve made your own Valentine’s pop up card!

Pop-Up Showcase: M.C. Escher Pop-Ups

Our friend Courtney Watson McCarthy brings M.C. Escher’s graphic art into pop-up 3D splendor in this beautiful coffee table book from BlueRed Press Ltd (2011). The book includes descriptions of the artwork and quotes from Escher himself.

Pop-Up Showcase: Human Body

Human Body: An Interactive Guide to the Inner Workings of the Body by Steve Parker (Barron’s 2008) has fantastic photos, illustrations, pull-tabs, pop-ups and other interactive features (engineered by Alan Brown and Zerina White). There’s a lot to discover here for kids of all ages. I liked opening the skull with the brain inside!

DIY Pop-Up: Ark

For this DIY Pop-Up you will need:

  • Cardstock or heavy construction paper
  • Scissors
  • Ruler
  • Paper clip, or ballpoint pen that has run out of ink, or a knitting needle
  • Crayons, colored pencils, markers

Instructions

1 Download the PDF templates and print out at 100% size (no scaling) on a heavy paper, such as cardstock.
2 Color all of your pieces with crayons or markers before scoring and cutting.

3 Using a ruler as a guide, take the rounded end of a paper clip (or a ballpoint pen that has run out of ink) and press along the dotted lines of the pop-up piece.
4 Using a ruler as a guide, take the rounded end of a paper clip (or a ballpoint pen that has run out of ink) and press along the dotted lines of the pop-up piece.
5 Carefully cut out the pop-up piece for the ark following the solid, black lines.

6 Carefully cut out the card for the ark following the solid, black lines.
7 Flip the pop-up piece over (so the dotted lines no longer show) and color using markers or crayons. You need to color the pop-up now because you won’t be able to once it is attached to the card.
8 After you are finished coloring, flip the pop-up over so you can see the dotted lines. Fold the tab on the side of the ark’s roof and crease with your finger.

9 Continuing in the same direction, fold the roof of the ark in half and crease with your finger.
10 This is how the ark’s roof should now look. It peaks up in the center the way a roof should!
11 Open the roof back up and return all the folds to their original positions. Fold the small tab shown inwards and crease with your finger. Return the tab to its original position.

12 Moving to the opposite end of the ark, fold over and crease along the dotted line right next to the giraffe. Open this piece back up again to its original position.
13 Starting at the far end near the bird, fold the end piece of the ark inwards and crease with your finger.
14 Continuing in the same direction, fold over the end of the ark and crease.

15 Continuing in the same direction, fold over the next piece of the ark with elephant on it and crease.
16 Continuing in the same direction, fold over the final piece of the ark and crease.
17 Fold back one of the tabs (shaped like water waves!) at the bottom of the ark and crease.

18 Flip the pop-up over and fold back the other tab shaped like water and crease.
19 Open the pop so you can see all the dotted lines. Put a small amount of glue in the area below the elephant’s head marked “Glue here.”
20 Pick up the pop and bring the tab (on the side with the giraffe) towards the glue area.

21 Lay the pop down and press the tab into the glue.
22 Put a small amount of glue on the remaining area marked “Glue here.”
23 Fold that piece over onto the remaining tab on the ark and press the glue. Let dry!

24 Fold the card in half along the dotted line and crease. Open the card.
25 Put a small amount of glue on the area marked “Glue here” on the RIGHT SIDE only.
26 Pick up the pop (with the bird at the top) and fold the RIGHT water tab backwards so it matches the position of the glue area. Look carefully at this picture and the picture in Step 27 so you’ll understand how to attach the pop to the glue area. Press the tab into the glue area.

27 Flip the pop-up over and fold back the other tab shaped like water and crease.
28 Put a small amount of glue on the remaining area marked “Glue here.”
29 Making sure the pop is laying completely flat against the card, begin to fold the card closed.

30 Close the card completely. Press on the card to make sure the glue area on the inside is adhering to the tab. LET DRY! Don’t open the card right away or the pop-up will come unglued!
31 Your pop-up ark is finished! Happy sailing!

Artist Watch: Johan Olander

Our friend and fellow child-at-heart Johan Olander has a great new book, My Robots: The Robotic Genius of Lady Regina Bonquers III (Amazon Publising, 2012).

It’s a collection of sketches and notes from the (fictitious) Lady Regina revealing her brilliant (and funny) designs, including the Slobot (a sewer cleaning robot) and the Babysitter Bot. We think it will inspire young artists and writers to keep on sketching and imagining.

Artist Watch: Matthew Davis

The paintings of Matthew Davis are like vivid dreams.  You can see what the image is, but it’s a little unclear since there isn’t a definitive line and the colors pop right out at you.  The British artist slowly drips pools of oil paint on different surfaces (sometimes aluminum, others canvas) and lets them dry before going back and adding more pools of color.  I absolutely love color and I’m blown away by the way he handles it.  You can find out more about Matthew Davis’ work here on his website.